Quick Start
This guide walks you through creating a fully-featured rich text editor with toolbar, text formatting, headings, lists, and custom fonts.
Minimal Editor
Section titled “Minimal Editor”The simplest setup — a text editor with bold, italic, and underline:
import { createEditor } from '@notectl/core';
const editor = await createEditor({  placeholder: 'Start typing...',  autofocus: true,});
document.getElementById('app').appendChild(editor);
That’s it. The createEditor factory auto-registers a TextFormattingPlugin with bold, italic, and underline enabled by default.
Runtime styling defaults to strict CSP-safe mode. For CSP policies and nonce wiring, see Content Security Policy.
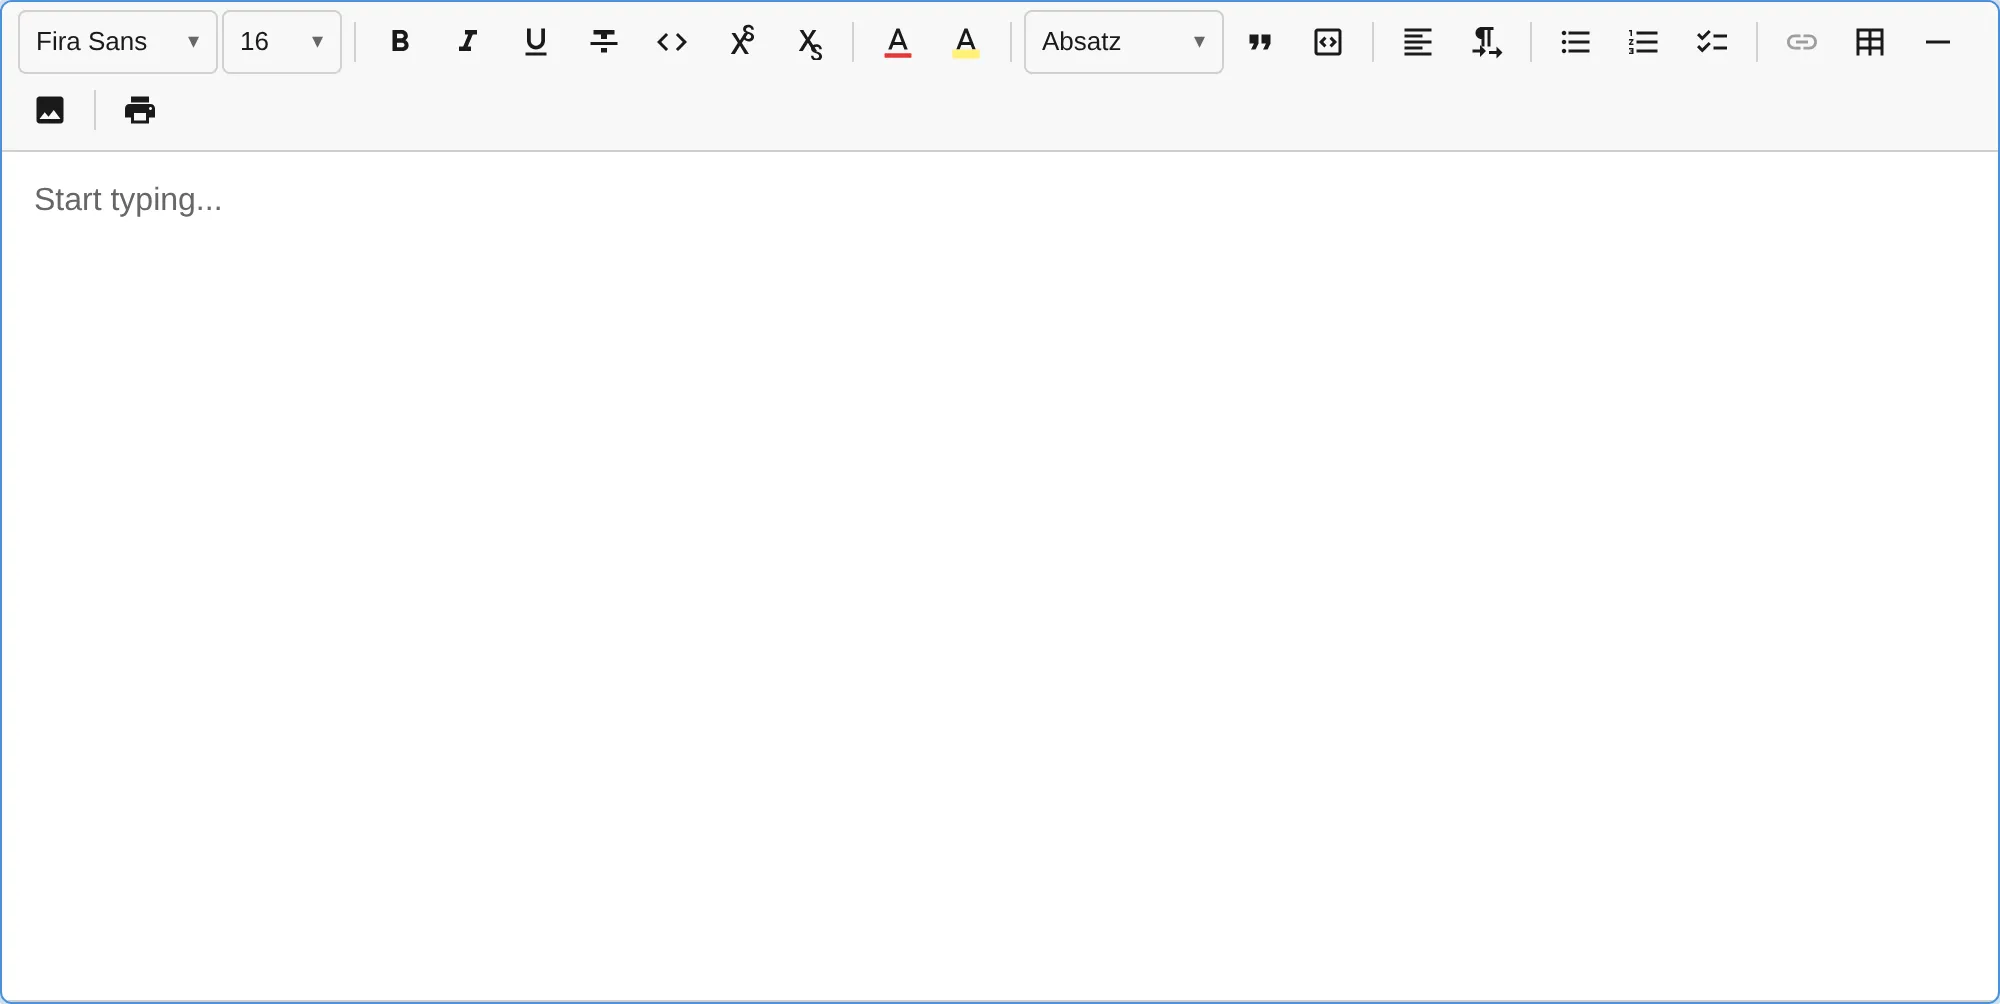
Full-Featured Editor
Section titled “Full-Featured Editor”The fastest way to get a production editor with all plugins is using createFullPreset():
import { createEditor, ThemePreset } from '@notectl/core';import { createFullPreset } from '@notectl/core/presets';import { STARTER_FONTS } from '@notectl/core/fonts';
const editor = await createEditor({  ...createFullPreset({    font: { fonts: STARTER_FONTS },  }),  theme: ThemePreset.Light,  placeholder: 'Start typing...',  autofocus: true,});
document.getElementById('app').appendChild(editor);
This gives you 8 toolbar groups with all standard plugins (font, text formatting, headings, lists, tables, code blocks, images, and more) plus HardBreakPlugin for Shift+Enter line breaks and SmartPastePlugin for intelligent paste handling.
You can override individual plugin configs:
const editor = await createEditor({ ...createFullPreset({ font: { fonts: STARTER_FONTS }, list: { interactiveCheckboxes: true }, heading: { levels: [1, 2, 3] }, }), theme: ThemePreset.Dark, placeholder: 'Start typing...',});See the Plugin Presets guide for all available options.
Custom Toolbar Setup
Section titled “Custom Toolbar Setup”If you need full control over which plugins appear and how they’re grouped, configure the toolbar manually:
-
Import the plugins you need
import { createEditor } from '@notectl/core';import { TextFormattingPlugin } from '@notectl/core/plugins/text-formatting';import { HeadingPlugin } from '@notectl/core/plugins/heading';import { ListPlugin } from '@notectl/core/plugins/list';import { LinkPlugin } from '@notectl/core/plugins/link';import { BlockquotePlugin } from '@notectl/core/plugins/blockquote';import { TablePlugin } from '@notectl/core/plugins/table';import { CodeBlockPlugin } from '@notectl/core/plugins/code-block'; -
Configure the toolbar layout
The
toolbaroption takes an array of arrays. Each inner array is a visual group separated by dividers:const editor = await createEditor({toolbar: [[new TextFormattingPlugin()],[new HeadingPlugin()],[new BlockquotePlugin(), new LinkPlugin()],[new ListPlugin()],[new TablePlugin()],[new CodeBlockPlugin()],],placeholder: 'Start typing...',autofocus: true,}); -
Add it to the DOM
document.getElementById('app').appendChild(editor); -
Listen for changes
editor.on('stateChange', ({ newState }) => {console.log('Content changed:', newState.doc);});editor.on('ready', () => {console.log('Editor is ready!');});
HTML Setup
Section titled “HTML Setup”Here’s a complete HTML page:
<!DOCTYPE html><html lang="en"><head> <meta charset="UTF-8" /> <meta name="viewport" content="width=device-width, initial-scale=1.0" /> <title>My Editor</title> <style> #app { max-width: 800px; margin: 2rem auto; } notectl-editor { display: block; border: 1px solid #e0e0e0; border-radius: 8px; min-height: 400px; } </style></head><body> <div id="app"></div> <script type="module" src="./main.ts"></script></body></html>Reading Content
Section titled “Reading Content”notectl provides multiple output formats:
// Get structured JSON (Document model)const json = editor.getJSON();
// Get sanitized HTMLconst html = await editor.getContentHTML();
// Get plain textconst text = editor.getText();
// Check if editor is emptyconst empty = editor.isEmpty();
Setting Content
Section titled “Setting Content”// Set content from HTMLawait editor.setContentHTML('<h1>Hello</h1><p>Welcome to <strong>notectl</strong>!</p>');
// Set content from JSON (Document model)editor.setJSON({ children: [ { type: 'paragraph', id: 'block-1', children: [{ type: 'text', text: 'Hello world', marks: [] }], }, ],});Programmatic Commands
Section titled “Programmatic Commands”// Toggle formattingeditor.commands.toggleBold();editor.commands.toggleItalic();editor.commands.toggleUnderline();
// Undo / Redoeditor.commands.undo();editor.commands.redo();
// Execute any registered command by nameeditor.executeCommand('toggleStrikethrough');editor.executeCommand('insertHorizontalRule');Framework Integration
Section titled “Framework Integration”Since notectl is a Web Component, it works in any framework:
import { useEffect, useRef } from 'react';import { createEditor } from '@notectl/core';import type { NotectlEditor } from '@notectl/core';
export function Editor() {  const containerRef = useRef<HTMLDivElement>(null);  const editorRef = useRef<NotectlEditor | null>(null);
  useEffect(() => {    let mounted = true;    createEditor({      placeholder: 'Start typing...',      autofocus: true,    }).then((editor) => {      if (mounted && containerRef.current) {        containerRef.current.appendChild(editor);        editorRef.current = editor;      }    });
    return () => {      mounted = false;      editorRef.current?.destroy();    };  }, []);
return <div ref={containerRef} />;}<script setup lang="ts">import { onMounted, onUnmounted, ref } from 'vue';import { createEditor } from '@notectl/core';import type { NotectlEditor } from '@notectl/core';
const container = ref<HTMLElement>();let editor: NotectlEditor | null = null;
onMounted(async () => { editor = await createEditor({ placeholder: 'Start typing...', autofocus: true, }); container.value?.appendChild(editor);});
onUnmounted(() => { editor?.destroy();});</script>
<template> <div ref="container" /></template><script lang="ts"> import { onMount, onDestroy } from 'svelte'; import { createEditor } from '@notectl/core'; import type { NotectlEditor } from '@notectl/core';
let container: HTMLElement; let editor: NotectlEditor | null = null;
onMount(async () => { editor = await createEditor({ placeholder: 'Start typing...', autofocus: true, }); container.appendChild(editor); });
onDestroy(() => { editor?.destroy(); });</script>
<div bind:this={container}></div><div id="app"></div>
<script type="module"> import { createEditor } from '@notectl/core';
const editor = await createEditor({ placeholder: 'Start typing...', autofocus: true, });
document.getElementById('app').appendChild(editor);</script>